My lab is lucky enough to have an Em2 stream table, built by the great folks at Little River Research and Design. Their founder/president/zeroth poobah, Steve Gough blogs about rivers and things, too.

It's been just about a year since I first set up the Em2 in the lab. Straight out of the box (off the shipping pallet, really), this thing does a lot of cool stuff. But for research, I wanted to tweak some of the variables. Or, at least quantify the characteristics of the stream table itself.
I began with looking at the plastic sand itself - I don't want to go over that today, but I've made a few references to the material before. A full-blown analysis of the sand that ships with the stream table is probably worth its own series of blog posts. For now, let's look at the flow of water from the pump into the stream table itself.
In hydrogeologic terms, the amount of water flowing past a specific spot (or cross-sectional area) for a particular period of time is called discharge (often labeled as Q, and is provided as a unit-volume per unit-time). If we know the cross-sectional area of the river, pipe, or whatever and the velocity of the flow, we can calculate discharge as area x velocity. An even easier method for small systems, although this averages out any instantaneous variation, is to simply hold a container underneath the open end of the pipe. Fill the container to some volume, use a stopwatch to calculate the time it took and divide the volume by the time.
The LRRD stream tables make things even easier - the water that comes from the pump pours out into a "notch gage." This notch gage gives you an "at-a-glance" view of the discharge. The higher up the notch the water is, the greater the discharge. Easy Peasy. No moving parts, no math, just eyeballs. Except that I wanted to compare high discharge experiments (high flow rates) to low discharge ones. Or if I wanted to repeat an experiment, I wanted a way to know the flow rates were the same. Bring on the bucket method described above.

First, I made reference marks on the gage itself starting at the bottom of the container, I made marks every 0.5 cm all the way to the top, giving me a reference point along the notch. Then, I placed the gage on a platform so I could put a bucket underneath to catch the water flowing out the notch. Now, set the flow to a certain reference point on the notch, collect water for a minute (or at least 10 seconds, depending on flow) and find out the volume of water. Repeat.

Using a ruler to make reference marks every 0.5cm.

Running the test using a faucet for flow and a 2x4 platform.
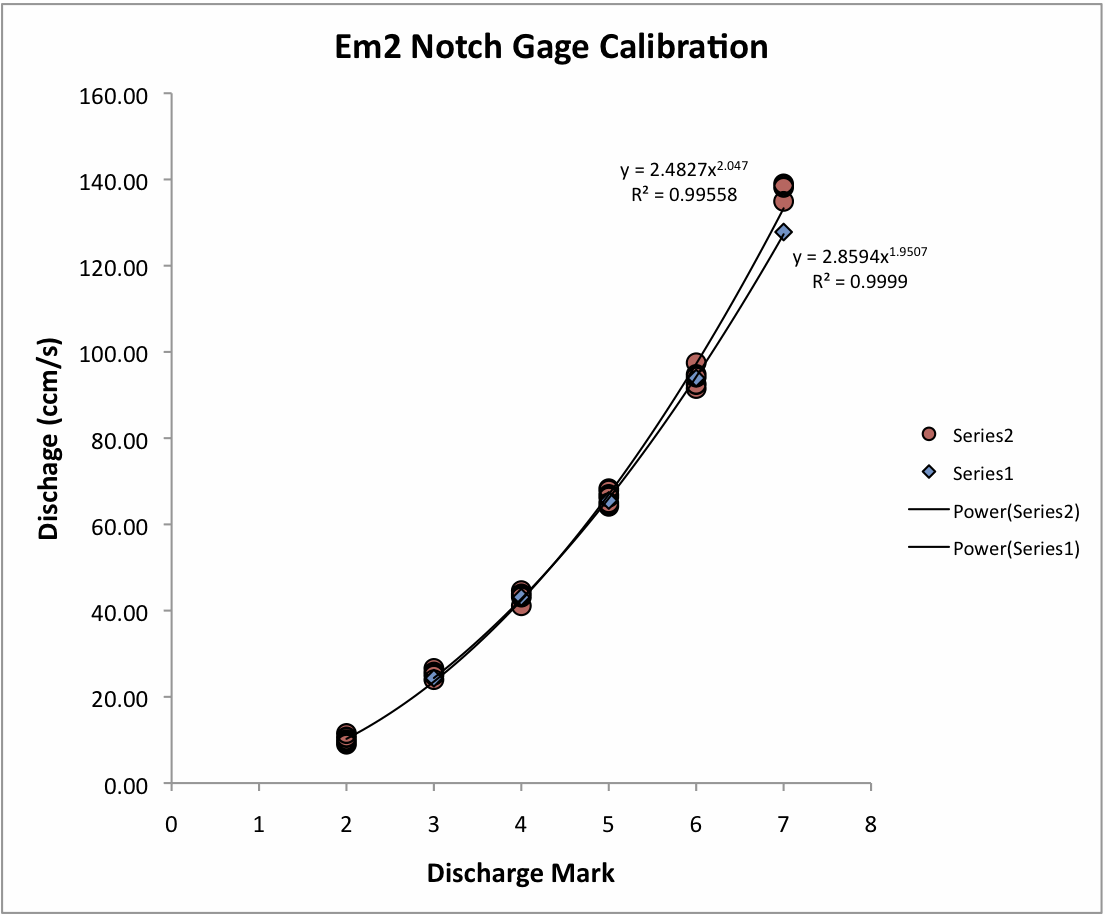
Graph of discharge versus notch mark (note: measuring flows below the 2nd mark were problematic because the surface tension of water prevented accurate water collecting)
Now I have data that tells me if I set the flow through the notch to the third mark, I know the discharge is about 24 cm3/sec. I can use it to monitor the pump and adjust things if there are changes in the hydraulic head (pump hose elevation, reservoir water level, etc.)
The best part? Anyone with the notch gage can do this too. And if the geometry of the notch gage is the same from one gage to another (presumably so) you can just make marks every 0.5 cm and go with my data. But if you're serious, you'll calibrate/confirm your own gage, right?
Go on, you know you're just itching to quantify stuff. I won't be able to attend GSA this year, so I'm hoping to give everyone a little taste of what I'm up to.

Stay tuned to see what I did to go from this...

To this - it's all about SCIENCE!
No comments:
Post a Comment